| Gothic Makeup
The Gothic eZine - Beauty Tips
Monique's Handy Guide to Making Yourself Look Dead SexyBy Monique Bellamont - November 2007. Done badly, Gothic makeup and dress can look painfully stupid. Your Gothic look should be as opulent, decadent, and original as possible. If you're not up to making the necessary effort to carry off this most high-maintenance of affectations, try wearing plaid shirts and listening to Nirvana instead. The following are some suggestions for how to do it:
Basic Skin CareBefore you even THINK about putting on makeup, you need to get your face in order. Hopefully you're already in the habit of washing your face at least once (preferably twice) a day. If not, start now. Don't you dare go for that bar of regular soap, either. Your face is delicate, and you don't need to be washing it with the same crap you use on your butt. Go buy some soap specially formulated for your face. Pumps are best, as bars tend to get messy and can be a breeding ground for bacteria (if you do use a bar, be sure to throw it away if it starts to crack.) There are a bevy of products on the market, so you shouldn't have a problem finding something you like (I'm partial to Neutrogena and Basis, which are both relatively inexpensive, and easily available at most grocery, drug, and Wal-Mart type stores.) After your face is squeaky clean, pat dry w/ a towel, and apply moisturizer. You'll find a bewildering array of these, and the one you choose will depend on your skin type, time of year (your skin will tend to be dryer in the winter), price range, and personal preference. You might want to go for something w/ AHA's (Alpha-Hydroxy acids) in it, as that's one of the current anti-aging-anti-acne-mark buzzwords. Other things to look for are various vitamins, lipids, "oil-free", non-comedogenic, and (perhaps most importantly), SPF as-high-as-you-can-find. Things to avoid would be anything lard-based. ;} I personally use a combination of Biore Hydrating Moisturizer and Neutrogena Healthy skin cream, depending on how my skin is behaving at the moment. You will probably want to invest in some sort of eye cream as well since the skin around your eyes (not to mention your eyes themselves,) is particularly delicate and you shouldn't use regular moisturizer on it. Beware of Ponds Age-Defying eye cream It works just fine, but stings like crazy if you get any in your eyes (not a good trait in an eye cream, if you ask me.) On the subject of eyes, you may have heard that you should be extremely careful in applying/removing things around your eyes, or you'll get wrinkles. I've heard people go so far as to say that you should only pat moisturizer around your eye, never rub even gently. Well, I think (and a lot of skin-care specialists agree,) that this is a bunch of hooey. Skin is very elastic, and you get wrinkles as you get older and the elastin just gives up. This has nothing to do w/ how much you've stressed the elastin, it just happens. ::shrug:: If you want to be super-safe, go ahead and pamper your eyes, but I say go ahead and rub 'em as hard as you like. Another nifty thing to do to your face is apply those Biore or Ponds pore-perfect strips. I've known several people who were dissatisfied w/ these, but I personally love them. If I could cover my entire face with them every day, I would. If you're having troubles getting the strips to pull anything out of your pores, try steaming your face first. Also, remember to leave the strip on 'till it's a completely dry potato-chip consistency. Remember, if these things do work for you, they'll leave little gaping holes in your face until the newly clean pores close up. Applying a toner (Biore and Neutrogena both make good ones,) w/ a cotton ball will help shrink your pores, but be sure to leave plenty of time (preferably a day,) between Biore-ing and putting on makeup, as makeup will probably accentuate your empty pore-pits and give you an unflattering pock-marked look. Also, as tempting as it may be, don't Biore more often than once every 3 days, and don't do it if you're breaking out unless you want your skin to get super irritated. Always wash your face before you put on makeup. Oils on an unwashed face will react w/ your foundation and cause streaking and fading. Be sure to wash your face at least 10 minutes before you begin applying makeup, to allow your moisturizer to soak in. As fellow diva, Ennui, pointed out; be sure to also wash your face thoroughly after you get home from clubbing (or whatever). Sleeping in your makeup not only ruins your bed clothes, but leads to clogged pores and a vicious cycle of always having to wear makeup to disguise how awful your skin is (mostly because you wear so much makeup). All of this is assuming that you have relatively normal skin. If you have severe acne, or have questions relating to particular skin problems, please see a dermatologist, or ask someone more qualified than I for advice.
Tools of the TradeMAKEUP: Well, duh! If you don't have any makeup yet, here are my suggestions for the bare minimum: liquid foundation, powder foundation, three complimentary colors of eyeshadow (light, medium, and dark), black eyeliner (I prefer pencil, especially if you're just starting out, but liquid will do just as well), black mascara, lipstick. You may also want to invest in some concealer, blush, white eyeshadow lip-liner, and lip-gloss. SPONGES: There's much debate in the makeup world over whether it's better to apply foundation w/ a sponge or your fingers. I like sponges. Buy a big bag of those little wedge-shaped ones, and use the short side to apply foundation, and the edges to blend eyeliner, eyebrows, etc. Q-TIPS: I would die without them. Not only can you apply/blend makeup with them, you can lick one and use it to clean up mascara/eyeliner/lipstick mistakes. BIG FAT MAKEUP BRUSH(ES): You will need at least one of these for powder foundation and blush. I have one for each, as its easier to be subtle when applying blush with a softer brush. "Subtle" is not the look I'm going for with powder, so I use a brush with stiffer bristles. Also, it's nice to keep colors out of your foundation brush so you don't have to keep cleaning it, and don't have to worry about accidently applying blush to your forehead. EYESHADOW BRUSHES: If you're anything like me, you will end up with a collection of subtlely different shapes and sizes. To start off, get one fluffy round one (like a powder brush, only smaller,) and one smallish wedge-shaped one. The bigger one is used for covering large areas of your eyelid, while the angled one is for contouring. It's also nice to have a brush set aside for just white eyeshadow. The one I use is shaped like a contour brush, and slightly larger than a standard eyeshadow brush. Why, some of you may ask, buy eyeshadow brushes at all when you get those cute little spongey things when you buy eyeshadow? Because, my pet, we're trying to act like *professional* makeup artists here, and professionals use brushes! More importantly, I find it much easier to do subtle shadings with brushes, and depending on what makeup you buy, eyeshadow very often doesn't come with an applicator. EYEBROW BRUSH: That's the one that looks kinda like a flattened toothbrush with a comb on the opposite side. Use it to style your brows before you line them, and seperate your eyelashes after you've put on mascara. You can get by with the brush from an old tube of mascara if you're income-challenged. EYEBROW CONTOUR BRUSH: Like an eyshadow contour brush, but with stiff bristles. I made mine by cutting the bristles a cheap makeup brush of unspecified purpose into an angled shape. Used to apply eyeshadow to your eyebrow. EYELINER BRUSH: Looks like a fine-tipped paint brush (and depending on where you buy it, might in fact *be* a fine-tipped paint brush). Wet it and drag it through any eyeshadow to create endless eyeliner possibilities. Also paint lovely blue veins on your face for Hallowe'en (or if you REALLY liked _Interview with a Vampire_ and want to be laughed out of your local goth club.) Once again, if you don't want to buy one, you can save the brush from a discarded tube of liquid eyeliner. LIP BRUSH: Flattish and thicker than the eyeliner brush. Use it for more precise lipstick application. Buy the best one you can afford. Cheap ones tend to shed, and hairy lips are NOT attractive. LITTLE POINTY SPONGEY THING: I have no idea what this is called. It's a little spongey cone on a stick, used for blending eyeliner. You can occaisionally find them sold seperately, but I just use the ones attached to eyeliner pencils (like Maybelline's Smoked Kohl Eye Liner). SPONGE-TIPPED EYESHADOW APPLICATOR: They do have their uses. Wet them before you apply your eyeshadow for a more vibrant effect than you get with a brush. PENCIL SHARPENER: You know. For pencils. BANANNA CLIP OR HAIRBAND OR SOMESUCH: To keep your hair out of your face while you're working. Disregard if you don't have hair. MIRROR: Preferably something big enough to see your whole face (the bathroom is probably a good place to look,) but anything reflective will do in a pinch. CABOODLE OR TACKLE BOX OR WHATEVER: Something to keep your makeup organized. Even if you never put your makeup on anywhere but your bathroom, it's a good idea to keep it all in one container (it really sucks to be in the middle of applying makeup only to have to stop and search for the right eyeliner for twenty minutes). Tackle boxes are a good choice if you're going to do any traveling (or if your roomates suck) because they usually have a place to put a lock.
|
|
Foundation, Concealer, and BlushSHOULD I WEAR FOUNDATION? Of course you should. It evens out your skin tone, cuts down on shine, and helps your makeup last longer by giving it something to stick to. If you're in a hurry, not getting completely gothed-out, or just don't like caking on makeup, you can probably get away with only wearing eyeliner/mascara or lipstick without foundation, but anything else really looks unfinished without base. Alternately, you can try dabbing foundation only on the reddish portions of your face and blending well into the rest. You might also try just brushing on some powder, though depending on your face and the powder, this can cause more problems than it solves. A WORD ABOUT WHITE-FACE: Okay, we all know that the stereotypical goth should have completely bone-white skin, right? Boullion Cubes. There's nothing sillier, in my opinion, that someone w/ dark or olive complexion trying to look pale, or *anyone* wearing stark white makeup. If you're naturally pale, bully for you! If you're not, that's fine, too. Don't try to go more than one or two shades paler than your natural skin tone. For the love of all that's holy, don't wear WHITE foundation, unless it's for a masquerade costume or somesuch. It tends to go on streaky, and just looks silly even if you do manage to put it on evenly. If you want to disregard my advice and go super-pale, either mix white foundation (Manic Panic and Cookie Puss both have nice ones,) w/ your regular base, or use a slightly off-white foundation (like Joe Blasco's TV White.) CHOOSING YOUR FOUNDATION: Try to find something that matches your skin tone (i.e. dissapears into your skin when you test it) or slightly paler. If you want to get really fancy, there are different colored bases and concealers (blue, yellow, green, etc.) designed to correct a bevy of skin problems. If you're having trouble making your face the color you want it, take a trip down to the mall to ask one of the helpful makeup representatives. They'll probably even give you a makeover if you ask very nicely, but it's only courteous to buy something while your there, or at least seriously consider it. It's very rude to waste a salesperson's time when all you want is a free makeover. There are several types of foundation: cream, liquid, cream-to-powder, and powder (loose or pressed). I've heard good things about cream-to-powder, but I've been less than pleased w/ the results on all I've tried. Cream tends to give a little more coverage than liquid, with the exception of the makeup of the gods (IMO): Revlon's ColorStay Makeup. I've loved this stuff since the moment I first tried it. It's not too pricey (around $10 here, and it lasts for a good long time), is easy to use, and stays on forever (looks fresh through many hours of dancing, needing only an occaisional powder touch-up). The original ColorStay formula does go on a little thick for daytime wear. They've got a lighter formula now, but I've not gotten around to trying it yet. As far as powder is concerned, I've got a big ol' tub o' "Rachel 1" Coty Airspun loose powder, a gothic mainstay for years. It's a little hard to carry around in a purse, though, so I have a compact of Revlon's Age-Defying powder for touch-ups. CONCEALER: If you've got halfway decent skin, you probably don't need it. On the occaision that I do have dark circles or zits, I just dab a little more foundation on over the powder. If you do use a concealer, remember to put it on before your foundation, blend well, and choose a color that matches or is one shade paler than your foundation (any lighter and you'll get a reverse-racoon eyes affect.) APPLYING FOUNDATION: First, find a mirror near a good light source. Those lights around your bathroom mirror are probably sufficient. Always try to avoid flourescent lighting--it makes anyone look like a drowned clown, no matter how superbly you've crafted your face. Clip or tie your hair out of your face. You've already washed and moisturized your face, right? Good. Just checking. If you're using a liquid foundation, shake well. Apply a little bit at a time w/ a sponge, blending each section of your face into the next. Remeber to cover your eyelids. (though you can probably skip your eyebrows and lips. If you're using Revlon's ColorStay, remember that you've got about a minute to play with it before it sets. After it sets, don't rub it or it'll get all weird and streaky. Pat gently to blend it, don't rub. There's some debate over how far down you ought to extend your foundation. I'm of the opinion that if you're using the right foundation, you don't have to worry about blending past your chin because your face will match the rest of your skin. If you're face is noticably paler than the rest of you, you might as well stop at your chin so it looks like you're wearing a mask (heck, why not pencil in some dark lines around your face, ala _Pinups_?) Either that, or continue your foundation over all exposed areas of your chin, neck, and chest. I personally stop the liquid foundation at my chin, then powder halfway down my neck. If you're going to be posing for pictures, definitely powder all exposed skin on your neck and chest. Light will be reflected/absorbed differently on powdered and unpowderd flesh, and you don't want your face to show up as a completely different color than the rest of you. Another tip if you're preparing for photos: keep the sparkly makeup to a minimum. It just doesn't translate well to film. Follow with powder to set your foundation and prevent shine. You can either glob it on w/ brush or pat it on with a sponge or powder puff (for thicker coverage than with a brush. For really dramatic coverage, try applying pressed powder with a damp sponge.) Remeber to blend well. If you're using loose powder, expect to make a mess (you might want to do your makeup before you get dressed up, or wear a smock or sheet over your clothes so you don't get powder all over everything.) To make Coty powder a little more manageable, you can cut a small hole in the plastic liner, carefully shake a little bit of powder out and brush from there. You can also cut the plastic out completely and cover w/ a large powder puff. Lift up the edge of the powder puff, dip your brush in the powder, tap excess onto the top of the puff, then use the little pile of powder on top. Repeat as necessary. Also keep your loose powder container in a ziploc bag, lest it contaminate your entire makeup case. BLUSH: Blush is something I really consider optional in goth makeup. What is the traditional purpose of blush? To give your face more color. I rest my case. Blush can be useful, however, to define cheekbones and (strangely enough,) to give your face more color. Conventional wisdom would have you apply blush to the apple of your cheek (over the cheekbone,) whereas for our purposes, I prefer under the cheekbone. If you're not sure exactly where to put it suck in your cheeks and follow the sunken area. Start darkest at your hairline, and blend toward your mouth. For a very subtle affect, you can use a shade of foundation slightly darker than the one you just slathered on your whole face. For more dramatic looks, think eyeshadow. Maybelline's Natural Accents Eyeshadows work particularly well since they go on somewhat sheer. The trick with blush is to start subtle and build on it until you have the look you want. The larger the brush you're using, and the softer the bristles, the easier it is to blend your blush. Remeber to tap your brush against something or blow on it before you apply the blush--it's much easier to keep adding more color than it is to take it off. If you _do_ end up w/ too much blush, try patting a little liquid foundation over it. For a really subtle look, you can put your blush on first, before your foundation (I usually apply it after the liquid and before the powder).
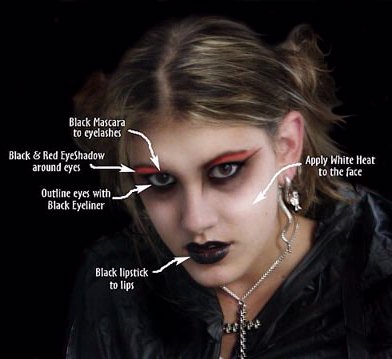
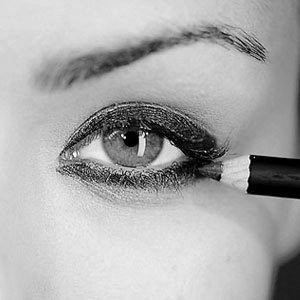
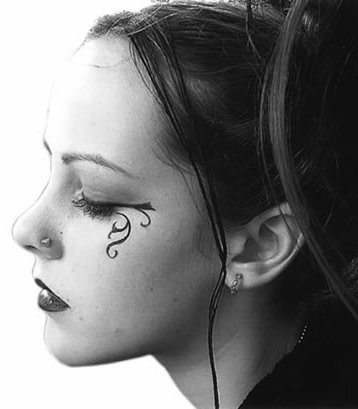
EyesEYEBROWS: First off, pluck 'em. Even if you want to keep your brows natural-looking, chances are you've got a few stray hairs you could stand to lose. A good time to do this is when you're fresh out of the shower--your pores will be more open then, and it'll hurt less. Buy the best pair of tweezers you can afford (trust me, the cheap ones suck. The two sides often aren't flush and you'll keep missing hairs) and always pluck in the direction of hair growth. It might help you to pencil in what shape you want your brows to be, then pluck the hairs outside of it. Be areful! Very often you'll discover that straggling brow hairs are super long, and when you pluck them you end up w/ an unexpected bald spot (if you want to be uber-cautious, try coloring the offending hair with a white eyeliner pencil to see what your brow will look like without that hair). Try trimming the stray tips of long hairs w/ small, blunt-ended scissors. I've heard that you should never pluck the hairs above your eyebrow. Nonsense. If they bug you, they're out of there! Just bear in mind (and this goes for all eyebrow hair,) that very often plucked hairs don't grow back, so don't go hog-wild, or you might end up with permanent bald-spots. If you want to take your eyebrows off completely and paint them on later, you have several choices. You can shave them (probably not your best option. Cutting your face sucks, and you get unsightly stubble very quickly), get them waxed professionally, or wax them yourself. I don't think I have to point out how stupid trying to Nair your eyebrows would be. Remember, getting rid of your eyebrows is a huge commitment--you pretty much have to wear makeup 24/7 if you don't want to look like Bob Geldof. You can compromise by only removing your brows from the highest arching point to your temple. That gives you a little more brow-shaping leeway when you're playing with makeup, but you still have _something_ there when you run to the store at 4 in the morning to buy milk. You'll still look a bit odd, but in a more Spock-like than Pink Floyd sort of way. There are several ways you can color your eyebrows. I usually use a small stiff-bristled eyebrow brush to apply eyeshadow, using the edge of my makeup sponge to very gently blend the outside edge. This is the most natural looking way to color your brows, but only works if you still have some of your own to start with. You can use any color eyeshadow to match or complement your hair or outfit or whatever. Usually I let the color-scheme of the rest of my makeup dictate my eyebrow color. If I'm trying to be relatively normal, I'll match my hair color (auburn, at the moment), if I'm being monochromatic goth-girly I'll go black, and if I'm being my standard glittery self I'll use whatever strikes my fancy (dark green and purple are two faves.) For a more dramatic look, line your brows with kohl eyeliner pencil. Use the little cone-shaped spongey thing on a stick to blend the pencil lines until they lose that crayon-like uneveness. Try a combination of powder and pencil. I often powder my brows first, then do the inner end and top edge in pencil to really define the brow. You can draw that little Siouxsie-esque Egyptian square edge thing by your nose w/ a pencil, again blurring the edges until everything blends together. To be still more dramatic, use liquid eyeliner to line your brows (probably your best bet if you're starting from scratch.) You're on your own here, as I'm really not very good with liquid eyeliner, and have never even attempted doing my brows with it. Take your time with your brows, paying special attention that they look even (not that they _are_ even, mind you, because they never really will be. Just look at your entire face as a whole and see if they _look_ even). As always, start small--you can always add more. If you do put too much liner on, lick a Q-tip and wipe off the excess, or carefully drag the edge of your used makeup sponge across the outer edge of your brow. Also, be sure that your eyebrows are long enough for your face. If your eyebrows are too far apart, your nose will appear wider. EYESHADOW: The most common form of eyeshadow is pressed powder. It's easy to use and doesn't make much of a mess, but you may still want to tap or blow excess shadow off of your blush before you apply it. You can also find eyeshadow in little pots of loose powder, which is kindof a pain in the ass to work with, but often worth it (especially in the case of mica-based shimmery powders. Dip your brush in the powder, then tap the excess off into the container lid. Repeat as desired, using the little bit you've got in the lid (you can dump any unused powder back into the container when you're done). There are also eyeshadow pencils and creme-to-powder eyeshadows, both of which I find to be an incredible bitch to get on evenly and a challenge to blend. If anyone has any tips on using them effectively, I'd love to hear them. Eyeshadow pencils do make lovely eyeliners and lipsticks, though. Before you start putting on eyeshadow, pat a bunch of excess powder under your eyes. That way you can easily brush away all the little bits of unwanted eyeshadow that will fall on your face while you work. You might actually want to dab some powder under your eyes before you do your eyebrows if you're lining them with powder. This is where your creativity really kicks in. Possible eyeshadow motifs are endless, but here are a few basic ideas to start you off. 1) Cat Eyes:Start off with a light background color, usually white, but silver, grey, yellow, pink, light green etc. are also good, depending on your mood. Using your contour brush (the one with the angled tip), apply a darker shade of eyeshadow along the crease, starting at the outer edge, and tapering/lightening toward the inner point. Sweep the color in a vaguely-triangular, upward-pointing pattern. Blend with larger eyeshadow brush. Repeat with a still darker shade in a smaller arc, so that the lighter shade will show up behind it. You can repeat this step with as many shades as you like, extending in a gradually lightening triangle all the way to your brow bone, or you could make your entire eyelid from edge to browbone one color, with only black in the crease to define it. You can also try reverse cat-eyes, which is the same basic idea, except concentrating on the inner rather than outer corner of the eyes (gives you a rather silent-movie-heroine sort of look). 2) Raccoon Eyes: Your basic goth look. Once again, try starting out by covering everything in white. Now color your eyelid from the lower edge to the crease with any color you choose (traditionally black, though I would reccomend a darkish grey instead.) Blend a bit into the white. You could also try adding a cat-eye type stripe of darker color along the crease. 3) New Wave Stripes: Choose several complementary colors in graduated stages of darkness (when I do this, I usualy use yellow, mauve-ish lavendar, and red). Start at the inner corner with the lightest color, and apply it in a solid, vertical (yet angled slightly outward,) stripe from inner corner of eye to inner tip of eyebrow to approximately a third of the way horizontally down your eyelid. Repeat with the next lightest color, adding another vertical stripe next to the first. Repeat with the last color, ending with a vaguely circular bit that connects your outer eyebrow tip with the outer corner of your eye. A little confusing without a picture, I know (I'll try to get access to a scanner soon, I promise!) Just think "80's". This is the one time that you probably don't want to blend the edges together. White eyeshadow (or silver) especially shimmery white eyeshadow really makes the eyes stand out when you apply it to the inner corner of your eye. Similarly, try brushing some along your browbone, just under the brow. EYELINER: There are two basic kinds-- pencils (sometimes called kohls), and liquid. Liquid tends to look more professional, but can be incredibly tricky to put on evenly. The only kind I can manage to not smear everywhere is Almay's I-Liner. It comes in a little pot with a long, thin lid and a felt pen-like tip. The long handle lets you grip the liner closer to the tip, allowing you more control. Pencils, on the other hand, are a lot easier to put where you want them, but they tend to cake up and go on unevenly. To fix that, smudge the line with either your little cone-shaped spongey thing on a stick (that's what it's there for,) or a Q-tip (or your finger, in a pinch). You can also rub the cone spongey in eyeshadow, and use that as a more subtle and easily blended eyeliner. You can also turn any eyeshadow into liquid eyeliner by dipping your eyeliner brush in water and dragging it over the eyeshadow. Again, use your imagination in applying your eyeliner (extravagant eyeliner is, afterall, one of the trademarks of gothic makeup). One of the gothy-standbys is to line your entire upper and lower lids in black eyeliner, ending in little points in the corners (or very dramatic points, if you so choose.) This looks good in either liquid or pencils if it's properly executed (just be aware that if you use liquid eyeliner under your eye, it's almost guaranteed to run, especially if you're sweating. Remember to check yourself in a mirror and touch up often. I usually use pencil on the lower lid, and liquid on the upper). For a less obvious look, you can line either your upper or lower lids, or both, stopping before the inner corner (and blending well, if you're using a pencil). Be aware, though, that lining only your bottom lid can make your eyes appear smaller. If you have problems applying your liner evenly, try making a few very small lines across your lid, and then connect the dots. Don't feel obligated to use only black! There's a world of color out there, many of which are suitable even for the least glittery-goth! Try smudging purple-y (or green, or whatever,) eyeshadow under your eyes with that spongey thing (would somebody PLEASE find out what the proper name for that thing is?). Red can be quite fetching, as well. If just the eyeshadow isn't enough for you, try applying a thinner line of black over it. This is an especially good idea if you've lined your eyes in red--it's a very cool, spooky look, but red eyeliner alone tends to shrink your eyes (not to mention give you that ever-so-attractive heroin chic look). You might be tempted to extend your eyeliner into all sorts of curlie-cues and embellishments. Some jaded old goths think this sort of thing is silly, but I say go for it! Just please follow a few guidelines to avoid ridicule. First of all, be creative. The eye of Horus (especially Death's single curly bit), Crow Makeup, Dawn's three tears, and Marilyn Manson's downward-swooping eye things have been done TO DEATH! Also, don't think that you must be symmetrical. It often looks more polished if you do a few big sweepy things on one side of your face and balance it with a similar-themed but much smaller thing on the other side (not to mention trying to get eyeliner-designs even on both sides is a PHENOMENAL pain in the ass.) Finally, if you do decide to get artsy with the eyeliner, for gods' sakes learn to use a liquid! Yes, it takes a steady hand and tons of practice, but trust me--pencil drawings on your face look wretched. If you can't draw in liquid, just don't bother. If you're really adventurous, you can try the raccon eyes detailed above in solid liquid eyeliner (Think Queen Mab in the recent made-for-TV movie _Merlin_). Probably not worth the trouble, but is quite striking if you pull it off. Whenver you're using liquid eyeliner, remember not to open your eyes all the way until the liner is completely dry. Use a hair dryer if you've used a lot of liner. If you do smudge your liner, or get the liquid uneven, or make any other mistakes, remember that spit-soaked Q-tips are your best friends. Oh, yeah, and no matter what type of liner you're using, it's easiest to apply it if you tilt your head back and look through half-closed lids. If you close your eye completely the lid will get all wrinkley and make it more challenging to get the liner even. A quick note about white eyeliner. Theoretically, when used on the upper lid instead of black liner, white attracts light and "opens up" the eye, making it appear larger. I don't like it. ::shrug:: Try it sometime, though, it might surprise you. Light silver ought to do the trick, too. You can also put white liner on the inside edge of your lower eyelid (just inside the lashes) to make your eye appear whiter, your pupils more dilated, and generally make you more attractive. It's a little tricky to apply (try gently pulling the skin under your eye down to move the lid away from your eye a bit), and many professionals recommend that you never ever line your inner eyelid (apparently you may clog your tear ducts or other nasty stuff.) In my experience, you probably don't want to try it if you have sensitive eyes (unless you want your eyes watering nonstop,) otherwise you're _probably_ okay. I've known people to put black on their inner eyelid, which does make one super-spooky, but also tends to make you look squinty. I also know one person who lined their inner eyelid in red, which was truly startling, and not entirely in a good way. To apply mascara, first wipe the excess stuff off of the brush (the side of the tube works well). Starting with your top lashes, use a firm but gentle side-to-side motion to get in between your lashes. If you want your lashes longer rather than thicker, brush from the back to the front, making sure to reach all of them. Repeat underneath your upper lashes, then on top of your lower ones. For darker lashes, you may want to re-dip the brush after each set of lashes. Next, use your eyebrow brush/eyelash comb to pick out any clumps and seperate any lashes that got stuck together. If your lashes still aren't big enough, apply another coat (hurry! It's less likely to clump if you don't let the mascara dry between coats.) Try not to apply mascara directly to your eyeball, and never pump the brush up and down in the tube (it traps air bubbles which can dry the mascara out). Once again, clean up any mishaps w/ a Q-tip. Colored mascara can be really fun, but I don't like the way it looks on its own. I either add a layer of color only to the top of my upper lashes, or to the very tips of all of them. ::shrug:: Once again, that's just my personal preference. You've gotta decide what works for you.
LipsFirst of all, try to get your lips in shape. If your lips are chapped, your lipstick is going to go on unevenly, and it's going to hurt like hell if you use a lipstick fixative. Try to train yourself to not bite your lips, or even lick them. Start carrying around some sort of lip balm and apply it often when you're not wearing makeup (look for as high an SPF as you can find, because we all know that the sun is not your friend). There are lip exfoliants available (I believe that The Body Shop has one called Lipscuff, but I've never tried it), but you can get rid of dead lip skin by globbing Vaseline on your lips, letting it soak in for about 10 minutes, then gently scrubbing with an old soft toothbrush. I've heard that you should apply foundation to your lips to keep your lipstick on longer, but in my experience this just makes an even thicker mess than usual out of my lipstick, and dries my lips out. If your lips tend to be dry, apply lip balm a minute or two before you put anything else on your lips. Be sure that it's a lip balm specially formulated to be worn under lipstick (like Revlon's Colorstay Lip Condition,) or your lipstick won't stick to your lips at all. The stereotypical goth look requires either black or red lips, but we're not stereotypical goths, are we? :} Don't get me wrong, black and red lipstick is lovely, and I wear both colors frequently, but don't be afraid to experiment. Match your outfit-- wear purple, green, blue, or whatever other color you fancy. You also don't have to have super-dark lips. I'm quite fond of the dark-eyes-lips-barely-there look you can acheive with white or silver lipstick. (In fact, according to conventional makeup wisdom, you shouldn't play up more than one feature at a time--ie. if you're wearing dramatic eyeshadow, you should make your lipstick subtle and vice versa. Not a rule I've ever adhered to, but I mention it here just to demonstrate that you don't have to go super-dark with everything all the time.) You'll probably want to start out with lipliner. Lipliner gives you a guide for applying the actual lipstick, and prevents lipstick from feathering (that's when it bleeds through those tiny little wrinkles around your lips. This is more likely to happen the older you get and the larger your wrinkles are.) Lining your lips also helps to define them and tends to look more finished than lipstick alone. You may also want to fill your entire lips in with lipliner and forgo the lipstick altogether, as lipliner tends to not wear off as easily as some lipsticks. All-over lipliner tends to be very drying, however, so you might want to some lipgloss over it (I generally use lipliner as a base, and then apply lipstick over it. It extends the wear of the lipstick without making my lips dry up and fall off in little bits.) Choose a liner that either matches your lipstick exactly or is darker. You'll look very odd and not altogether appealing if your liner is lighter than your lips. To apply liner, open your mouth, stretch your lips all over the place, and generally look like an ass while you strive to find the position that stretches your lips out perfectly. You can follow the line of your lips exactly, or spice them up a little by adding little pointy bits on your cupid's bow (that top little divet thing) or whatever. You can line just inside your lips to slim them a bit, or just outside to plump them up, but be careful or you'll end up looking like a clown or an escapee from Glamour Shots. Be sure to apply liner all the way into the corners of your lips, but apply it very lightly in the corners or you'll have messy lip stuff sticking out unnatractively on either side of your mouth. Take a step back from the mirror and make sure your lips are even. Add more liner or use the ubiquitous damp Q-tip to remove excess until you're even. If you're looking for a more subtle liner effect, wait until after you put your lipstick on to line it. I usually line, apply lipstick, then line again, blending the liner w/ the lipstick for a smoother finish. If you've already lined your lips, slapping on some lipstick will be easy. We all learned to color in the lines back in kindergarten, right? If you opt for lipstick without liner (probably your best bet if you're going for the barely-there look), getting it even is going to be a bit more of a challenge (I still can't put lippy on without liner to save my life...) but you always have those Q-tips to help you out. I actually find it easier to apply solo lippy with my finger, rather than straight from the tube. For more precise lipstick application, you might want to use a brush (brushes are also really excellent for digging that last little bit of your favorite shade out of the bottom of the tube). If you want to get really enterprising, scrape a little bit of lipstick off of two or more tubes, then mix them together and apply them with a brush or your fingers (look at your local beauty or theatrical supply store for special plastic palettes and palette knives designed for just this sort of thing, or buy similar stuff at an art supply store. A butter knife and a plate will work, too.) To give your lips that sexy "pouty" look, blend a little bit of light-colored lipgloss or lipstick in the middle of your bottom lip. I sometimes put a completely different (darker) shade of lipstick on my upper lip, or go over the lipstick on my entire upper lip with the darker lipliner. Something else you might want to try is the tiny little silent movie starlet/creepy baby doll lips. In this case, you will want to apply foundation to your lips (at least the outer corners) so they will disapear into your face. Use liner to sketch the shape of your wee little lips in the middle of your real lips, touching them up until you're happy with them, then color them in. Not a look I personally can pull off, but I've seen some people wear it well. Occaisionally I'll see someone with super-extended lip liner ala the Crow. I can't say that I'd reccomend this look, but if you have your heart set on it, I would advise that you use that little spongey cone thing on a stick to blend the outer edges. And PLEASE make sure it's all even.
From Dusk til DawnThe first step in ensuring your long-term fabulousness is starting out with the right materials. In my world, makeup falls into one of three categories: crap, drugstore, and department store. You really do get what you pay for with makeup--the expensive stuff really is better (generally speaking). Buy the best makeup you can afford, but don't knock yourself out over it. The department store brands (MAC, Nars, Urban Decay, Chanel, etc.) are really nice, but I don't see enough of a difference between them and the good drugstore brands (Revlon, Maybelline, Loreal, etc.) to warrant paying over twice as much for them. Most of the REALLY cheap makeup (Wet n' Wild and Cover Girl ::shudder:: for instance,) just sucks. Of course, quality isn't as crucial for some makeup as it is for other types. You'll want a really good foundation and eyeliner, but you can probably get away with cheap eyeshadow and lipstick. One of the best things to happen to makeup (IMO) is the recent advent of Revlon's Colorstay line (and other similar products). This stuff really does work! Colorstay lipstick tends to be very drying, so I generally use it under regular lipstick (best of both worlds!) Colorstay eyeliner is a must-have (at least for me), as you have to work really hard to smudge it once it's set. Always buy waterproof everything. If your lipstick never wants to stay put, see if you can score a lipstick sealer (I found mine at Sally's). After you apply your lipstick, blot it on a kleenex or paper towel or whatever, then brush the sealer over all of it. Keep your mouth open 'till it dries. Wipe any lipstick goo off of the brush before you close it, and make sure there's no sealer residue around the top of the bottle or it will glue itself shut. Also, be prepared for some potential unpleasantness. The bottle warns: "slight tingling may occur. Extra caution if lips are cracked or dry." What it should say is "brace yourself for nasty stinging if your lips are at all chapped". If you're wearing colorstay lipcolor, or lipliner under your lipstick you can probably skip this step (you probably don't need it, and it might make your lipstick too thick and cakey.) If you want to make sure your makeup isn't going to go anywhere, mist your face LIGHTLY with some hairspray. Remember to close your eyes, hold your breath, and extinguish all open flames before doing so. While you're out, check your makeup often. I generally just whip out my compact and do touch-ups wherever I happen to be, but you may want to run to the bathroom first (of course, if you do this too often in the course of an evening, people will either think you're a junky or you hve the runs.) Always carry powder with you, and pat some on wherever you see shine (recently mainstream makeup has seen atrend towards "dewey" complections. Fech. Shiney is bad. You want to be completely matte at all times--except of course for glitter or shiney lips.) Make sure your eyeliner/mascara isn't running. You might want to stash some of those marvelous Q-tips in your purse or pocket (in a ziploc bag or something so they don't get all nasty) especially if you're wearing liquid eyeliner under your eye. Also check your teeth for lipstick (to reduce the chances of colorful teeth, brush your teeth before you apply makeup (lipstick loves plaque), and blot your lipstick to make sure it's not too thick.) Always drink through a straw. If you tuck it into the corner of your mouth, very little of your lipstick will have the opportunity to transfer to your straw. If you're eating something with a fork or spoon, you should be able to do so without touching anything with your lips (think small bites). Bread, cookies, muffins or whatever can be broken into tiny bits and then popped into the mouth. Greasy foods like hamburgers are probably going to ruin your lipstick no matter what you do, so you might want to wipe your lipstick off before you start eating. When you're done, check your lipstick and reapply, if necessary (some people find it very rude to fix your makeup at the dinner table. I'm not one of them, but depending on the company you might want to excuse yourself to the bathroom.) Never re-apply lipstick over the old lipstick or it will get uneven, cakey, and generally nasty. Wipe the lipstick remnants off and start over. Don't touch your face, rub your eyes, or lick your lips. This might be a little hard when you first start wearing makeup, but it shouldn't take long to train yourself to leave your makeup alone. Don't make out with anyone until you remove your lipstick, unless, of course, you want to mark your territory and have lipstick smeared worse than Robert Smith.
Different Types of Glitter and How to Use itGlitter, how do I love thee? Let me count the ways... GLITTER GEL is affordable, easy to use, and quite versatile. It used to be that you had to stock up on the chunky stuff around Hallowe'en, but now you can find it most everyplace that sells makeup. The big chunky glitter gel is good for over-all body application, or accents on the face, but it tends to be a little thick on the lips. Try to find finer-grit (is that how one refers to the size of glitter particles? Grit?) gel for your lips, or a more subtle all-over effect. BEN NYE'S AQUA GLITTER is glitter suspended in a water-based solution, complete with an applicator brush in the cap. You can use this for all sorts of highlights. Usually, I see it used just above the upper eyelid in place of eyeliner, but you run the risk of getting it in your eye there. I like to run it along my browbone, just under my eyebrow. Be warned, this stuff gets very messy. A little goes a long way, and it takes less time to dry if you put on several thin layers rather than one thick one. Be sure to keep the rim of the bottle clean so it doesn't glue itself shut, and be prepared for it to leak. It tends to dry up in the bottle, but you can just add a little water if that happens. STICKS AND ROLL-ON GLITTER give the same basic effect as glitter gel. They're a little less messy to use, but don't offer as much coverage. Not bad for accents, but if you're covering a lot of area, stick to the gel. PIXIE DUST is the be-all-end-all of glitter goth accessories. Don't waste your money on store-bought glitter gel, hair gel, or lotion. Trot on down to the local craft store and stock up on Gick's Original Prisma Glitter, or any other kind of ultra fine craft glitter. I just dump it straight on my body, and it stays just fine (well, it doesn't REALLY stay--it gets all over everything everywhere I go--but enough of it stays to leave me glittery all night. Besides, what could be better than marking your territory with glitter?) To give your pixie dust a little more staying power you can mix it with any body lotion. You can mix glitter into hair gel, too, which is when the coarser-grit glitters can be fun (Gick makes one variety with tiny silver stars that looks fabu stuck in your hair). Stay away from the glow-in-the-dark glitter. The glow chunks won't stick to your body, and if you manage to get them to stay in your hair they just look weird, not glowey. Also, don't try mixing glitter with hairspray, or it will clog the pump. You CAN sprinkle glitter in your hair and follow it up with hairspray to assure that it stays there. Be warned: as soon as you bring pixie dust into your house, you will never be able to get it out. It gets into everything, and if you wear glitter on any sort of regular basis, you will have a light patina of glitter even on days you don't apply new glitter. It will be in your clothes, in your carpet, in your car, on your pets, on your SO, in your food, and everywhere else you can imagine. (Don't worry about the food thing--a bored friend of mine wrote to the Gick company inquiring as to the safety of accidently ingesting glitter, and the nice lady who answered her letter assured her that it was completely harmless.) A more serious caveat to wearing glitter: although today's glitter is acrylic, not little bits of metal like the glitter of bygone eras, it can still cause some damage if it gets into the wrong places--namely, the eyes. Be careful if you're using glitter anywhere near your eyes, especially if you wear contacts. Oh, and if you're an exotic dancer, don't wear your glitter to work. Guys as a rule are unimpressed by glitter, and they really HATE having to explain to the little wife why they're covered in it. STICK-ON JEWELS: Hey, Gwen may have made them popular, but some of us have been glueing crap to our faces for years. You can find special "body jewel kits" at various trendy stores for anywhere between $5-$10 dollars. If you buy them, I will laugh at you. Go to a craft store (or Wal-Mart, if one near you has a craft section) and case the bead and sequin section for acrylic jewels. They come in a wide variety of colors, shapes, and sizes, and generally run between $1-$5 for a whole mess of 'em. You can use eyelash glue, liquid latex (that would be eyelash glue in a larger bottle with a brush in the cap), spirit gum, or crazy glue (some of my friends swear by crazy glue, and assure me that it does come off after a night of sweating, but I've never really cared to try it). I use spirit gum, because it's a little less messy than latex. Coat the back of the jewel w/ spirit gum, then tap it until the glue becomes sticky. Apply wherever you like. Repeat as desired. You might want to use tweezers to manipulate the smaller jewels. The jewels are, of course, re-usable. I f they start to get all gummed up with dry glue, try wiping them with alcohol (acetone should work, too). Just be careful, because the alcohol can take the silver backing off of the jewel along with the schmutz. Try sticking other stuff to your face. Sequins work well, and I've got some lovely plastic crosses I picked up at a party supply store. I've seen some ornate Indian Bindhi's for $7 at Sally's, which were quite lovely. I suspect you could get them more cheaply if you can locate an Indian market, though.
The Wonders of Mica-Based Loose PowderThe most amazing stuff on earth... Basically, what this is is makeup without the fillers. It's pure, sparkly color, and it's up to you to decide how you want to use it. If you're lucky, your local mall will have a "True Colors" kiosk somewhere in the middle of it. Sally's also carries True Colors, and you can also usually find other brands of loose mica powder at theatrical supply stores (La Femme Sparkle Dust, for instance). I also found some on clearance in a trendy mall clothing store, marketed under the brand name "Fomula X". EYESHADOW: Mica powder goes on rather sheer with a brush, and is very messy to work with. I actually find it a little easier to apply with my finger. Try layering dry mica powder over regular eyeshadow. If you want a more dramatic look, wet a sponge-tipped eyeshadow applcator, dip it in the powder, and spread it evenly on your lids. Be aware that if "acrylic polymers" are one of the ingredients, there's pixie dust in it. This looks really neat, but doesn't stay on as well as mica alone does. After your eyeshadow is dry, gently brush off any excess. EYELINER: Wet your liner brush, dip it in the mica, and use it as you would any other eyeliner. LIPSTICK: True Colors makes a lip gloss especially for this purpose, but any gooey lip balm ought to work. Smear your lips with the gooey stuff, then rub the mica into it until it sortof liquefies. Repeat until your lips are evenly colored. You can also pat a little bit of mica onto regular lipstick for a bit of added sparkle, but it tends to be rather drying if you're not wearing very moisture-rich lipstick. BLUSH/GENERAL HIGHLIGHTS: Use it as you would any blush (being extra sure to blow/knock off any excess before applying) or brush it onto whatever area you want to make sparklier. NAILPOLISH: Use any clear nailpolish. Dip the brush in the mica, then apply to nails. It takes a bit of experimentation to figure out the ideal nailpolish-to-mica ratio, but it really works! FOUNDATION: Well, don't use the little pots of almost-pure-mica as foundation, but several companies do put out loose powder foundation with mica in it (Loreal just released their "Gilded Glo Illuminating Powder", and I believe that MAC and Clinique both have similar products.) I just use it for highlights, but it's subtle enough that you can probably get away with using it in lieu of your regular loose powder (if you do that, though, remember to powder your neck and chest as well so you don't have a sparkly face stuck onto a matte body).
| |